Friday, November 12, 2021

gcloud init

 hungnv@Precision-M4800:~/.ssh$ gcloud init

Welcome! This command will take you through the configuration of gcloud.


Your current configuration has been set to: [default]


You can skip diagnostics next time by using the following flag:

  gcloud init --skip-diagnostics


Network diagnostic detects and fixes local network connection issues.

Checking network connection...done.                                                                                                                                  

Reachability Check passed.

Network diagnostic passed (1/1 checks passed).


You must log in to continue. Would you like to log in (Y/n)?  y


Your browser has been opened to visit:


    https://accounts.google.com/o/oauth2/auth?response_type=code&client_id=32555940559.apps.googleusercontent.com&redirect_uri=http%3A%2F%2Flocalhost%3A8085%2F&scope=openid+https%3A%2F%2Fwww.googleapis.com%2Fauth%2Fuserinfo.email+https%3A%2F%2Fwww.googleapis.com%2Fauth%2Fcloud-platform+https%3A%2F%2Fwww.googleapis.com%2Fauth%2Fappengine.admin+https%3A%2F%2Fwww.googleapis.com%2Fauth%2Fcompute+https%3A%2F%2Fwww.googleapis.com%2Fauth%2Faccounts.reauth&state=2if9qKSA58SiB8jU1vvQGTg1zILv8z&access_type=offline&code_challenge=iGR3H7jmvLYaUppkwr9pWJz7b7PEQvFZVOu7YUW6jpY&code_challenge_method=S256


You are logged in as: [vanhung2210@gmail.com].


Pick cloud project to use: 

 [1] studying-22101989

 [2] Create a new project

Please enter numeric choice or text value (must exactly match list item):  1


Your current project has been set to: [studying-22101989].


Do you want to configure a default Compute Region and Zone? (Y/n)?  y


Which Google Compute Engine zone would you like to use as project default?

If you do not specify a zone via a command line flag while working with Compute Engine resources, the default is assumed.

 [1] us-east1-b

 [2] us-east1-c

 [3] us-east1-d

 [4] us-east4-c

 [5] us-east4-b

 [6] us-east4-a

 [7] us-central1-c

 [8] us-central1-a

 [9] us-central1-f

 [10] us-central1-b

 [11] us-west1-b

 [12] us-west1-c

 [13] us-west1-a

 [14] europe-west4-a

 [15] europe-west4-b

 [16] europe-west4-c

 [17] europe-west1-b

 [18] europe-west1-d

 [19] europe-west1-c

 [20] europe-west3-c

 [21] europe-west3-a

 [22] europe-west3-b

 [23] europe-west2-c

 [24] europe-west2-b

 [25] europe-west2-a

 [26] asia-east1-b

 [27] asia-east1-a

 [28] asia-east1-c

 [29] asia-southeast1-b

 [30] asia-southeast1-a

 [31] asia-southeast1-c

 [32] asia-northeast1-b

 [33] asia-northeast1-c

 [34] asia-northeast1-a

 [35] asia-south1-c

 [36] asia-south1-b

 [37] asia-south1-a

 [38] australia-southeast1-b

 [39] australia-southeast1-c

 [40] australia-southeast1-a

 [41] southamerica-east1-b

 [42] southamerica-east1-c

 [43] southamerica-east1-a

 [44] asia-east2-a

 [45] asia-east2-b

 [46] asia-east2-c

 [47] asia-northeast2-a

 [48] asia-northeast2-b

 [49] asia-northeast2-c

 [50] asia-northeast3-a

Did not print [36] options.

Too many options [86]. Enter "list" at prompt to print choices fully.

Please enter numeric choice or text value (must exactly match list item):  29


Your project default Compute Engine zone has been set to [asia-southeast1-b].

You can change it by running [gcloud config set compute/zone NAME].


Your project default Compute Engine region has been set to [asia-southeast1].

You can change it by running [gcloud config set compute/region NAME].


Created a default .boto configuration file at [/home/hungnv/.boto]. See this file and

[https://cloud.google.com/storage/docs/gsutil/commands/config] for more

information about configuring Google Cloud Storage.

Your Google Cloud SDK is configured and ready to use!


* Commands that require authentication will use vanhung2210@gmail.com by default

* Commands will reference project `studying-22101989` by default

* Compute Engine commands will use region `asia-southeast1` by default

* Compute Engine commands will use zone `asia-southeast1-b` by default


Run `gcloud help config` to learn how to change individual settings


This gcloud configuration is called [default]. You can create additional configurations if you work with multiple accounts and/or projects.

Run `gcloud topic configurations` to learn more.


Some things to try next:


* Run `gcloud --help` to see the Cloud Platform services you can interact with. And run `gcloud help COMMAND` to get help on any gcloud command.

* Run `gcloud topic --help` to learn about advanced features of the SDK like arg files and output formatting

Wednesday, July 10, 2019

Saturday, July 6, 2019

Deployment to Heroku (using Heroku CLI)

//package.json
"scripts": {
 "start":"node path/to/your/app.js"
 },
//app.js
const port = process.env.PORT || 3000
const app = express()
... 
app.listen(port, () => {
 console.log('server up on port ' + port)
})
heroku login
heroku keys:add // add ssh public key to heroku
git init 
git add . 
git commit -m "your comment comes here"
heroku create your-project-name // create a project on heroku
heroku git:remote -a tecknovice-weather-server // add remote branch
heroku buildpacks:set heroku/nodejs //or any another language
git push heroku master //push code from local to remote branch
heroku logs --tail // for real time logging

Tuesday, May 29, 2018

Google Cloud Translate Sample

Java Version

This sample requires you to have Java8.

Download Maven

This sample uses the Apache Maven build system. Before getting started, be sure to download and install it. When you use Maven as described here, it will automatically download the needed client libraries.

Authentication

This sample uses API Key for authentication.
 API Manager > Credentials > Create credentials > API Key
  • Set the environment variable GOOGLE_API_KEY
 export GOOGLE_API_KEY=<YOUR_PROJECT_API_KEY>


Download Source code

 
git clone https://github.com/GoogleCloudPlatform/java-docs-samples.git
cd java-docs-sample/translate

Run the sample

To build the sample, we use Maven.
mvn clean compile assembly:single
We can then run the assembled JAR file with the java command. The variable $COMMAND takes three values langsupport, detect and translate.
JAR_FILE=target/translate-1.0-jar-with-dependencies.jar
java -jar $JAR_FILE <detect|translate|langsupport> <text>
    <optional_source> <optional_target>
Example Usage:
INPUT="A quick brown fox jumped over a lazy dog."
SOURCE_LANG="en"
TARGET_LANG="fr"
Translate API Features:
  • List the languages supported by the API
    java -jar $JAR_FILE langsupport
    
  • List the languages supported for given target language
    java -jar $JAR_FILE langsupport $TARGET_LANG
    
  • Detect input text language
    java -jar $JAR_FILE detect "$INPUT"
    
  • Translate input text (with options)
    java -jar $JAR_FILE translate "$INPUT"
    java -jar $JAR_FILE translate "$INPUT" $SOURCE_LANG $TARGET_LANG
    

Translation API Client Libraries (Java)

Installing the client library

Setting up authentication

To run the client library, you must first set up authentication by creating a service account and setting an environment variable.
GCP Console


  1. Go to the Create service account key page in the GCP Console.
    Go to the Create Service Account Key page
  2. From the Service account drop-down list, select New service account.
  3. Enter a name into the Service account name field.
  4. From the Role drop-down list, select Project > Owner.
    Note: The Role field authorizes your service account to access resources. You can view and change this field later using GCP Console. If you are developing a production application, specify more granular permissions than Project > Owner. For more information, see granting roles to service accounts.
  5. Click Create. A JSON file that contains your key downloads to your computer.

Enviroment Variables
Provide authentication credentials to your application code by setting the environment variable GOOGLE_APPLICATION_CREDENTIALS. Replace [PATH] with the file path of the JSON file that contains your service account key, and [FILE_NAME] with the filename.

Clone source
git clone https://github.com/GoogleCloudPlatform/java-docs-samples.git
cd ./java-docs-samples/translate/cloud-client

Build your project with:
mvn clean package -DskipTests
You can then run a given ClassName via:
mvn exec:java -Dexec.mainClass=com.example.translate.ClassName \
    -DpropertyName=propertyValue \
 -Dexec.args="any arguments to the app"

Translate a string (using the quickstart sample)

mvn exec:java -Dexec.mainClass=com.example.translate.QuickstartSample

Quickstart Google Cloud Translation API

This page shows how to make a Google Cloud Translation API request with curl.

Before you begin

  1. Set up a GCP Console project. Set up a project
    Click to:
    • Create or select a project.
    • Enable the Cloud Translation API for that project.
    • Create a service account.
    • Download a private key as JSON.
    You can view and manage these resources at any time in the GCP Console.
  2. Install and initialize the Cloud SDK.
  3. Provide authentication credentials to your application code by running the following command. Replace [PATH] with the location of the JSON file that contains your credentials.
    gcloud auth activate-service-account --key-file=[PATH]

Make a Translation API request

Make a Translation API Request using a REST method call to the v2 translate method.
  1. Use curl to make a request to the https://translation.googleapis.com/language/translate/v2 endpoint.
    The curl command includes JSON with the text to be translated (q), the language to translate from (source), and the language to translate to (target).
    The source and target languages are identified using the iso-639-1 codes. The source language is English (en) and the target language is Spanish (es). The format of the query is noted as "text" for plain text.
    The sample curl command uses the gcloud auth print-access-token command to get an authentication token.
    curl -s -X POST -H "Content-Type: application/json" \
        -H "Authorization: Bearer "$(gcloud auth print-access-token) \
        --data "{
      'q': 'The Great Pyramid of Giza (also known as the Pyramid of Khufu or the
            Pyramid of Cheops) is the oldest and largest of the three pyramids in
            the Giza pyramid complex.',
      'source': 'en',
      'target': 'es',
      'format': 'text'
    }" "https://translation.googleapis.com/language/translate/v2"
      
    You should see a response similar to the following:
    {
      "data": {
        "translations": [
          {
            "translatedText": "La Gran Pirámide de Giza (también conocida como la
             Pirámide de Khufu o la Pirámide de Keops) es la más antigua y más
             grande de las tres pirámides en el complejo de la pirámide de Giza."
          }
        ]
      }
    }
    
      
Congratulations! You've sent your first request to the Cloud Translation API!

Clean up

To avoid unnecessary Google Cloud Platform charges, use the GCP Console to delete your project if you do not need it.

Wednesday, May 23, 2018

Quickstart for Node.js in the App Engine Flexible Environment

This quickstart shows you how to create a small App Engine application that displays a short message.

Before you begin

Before running and deploying this sample, take the following steps:
  1. Use the GCP Console to create a new GCP project, create an App Engine application, and enable billing:
    Go to App Engine When prompted, select the region where you want your App Engine application located and then enable billing.
  2. Install the following prerequisites locally:
    1. Download and install git.
    2. Prepare your environment for Node.js development.
    3. Download and install the Google Cloud SDK and then initialize the gcloud tool:
      Download the SDK
  3. Alternatively: You can use Google Cloud Shell, which comes with git and Cloud SDK already installed, and many other features, such as language support and code editors. After Google Cloud Shell is launched, you can proceed with the rest of this tutorial and execute your commands within Cloud Shell.
This quickstart demonstrates a simple Node.js application written with the Express.js framework.

Download the Hello World app

We've created a simple Hello World app for Node.js so you can quickly get a feel for deploying an app to the App Engine flexible environment. Follow these steps from a command line to download Hello World to your local machine.
Download the sample app and navigate into the app directory:
  1. Clone the Hello World sample app repository to your local machine:
    git clone https://github.com/GoogleCloudPlatform/nodejs-docs-samples
    
    Alternatively, you can download the sample as a zip file and extract it.
  2. Change to the directory that contains the sample code:
    cd nodejs-docs-samples/appengine/hello-world/flexible

Run Hello World on your local machine

  1. Install dependencies for this project by entering the following command:
    npm install
    or if you are using Yarn:
    yarn install
  2. Run the start script.
    npm start
    or if you are using Yarn:
    yarn start
  3. View your app in your web browser:
    • If you are using Cloud Shell, in the toolbar, click Web Preview and select Preview on port 8080 instead.
    • If you are not using Cloud Shell, enter the following address:
      http://localhost:8080
      
You can see the Hello World message from the sample app displayed in the page.
In your terminal window, press Ctrl+C to exit the web server.

Deploy and run Hello World on App Engine

To deploy your app to the App Engine flexible environment:
  1. Deploy the Hello World app by running the following command from the hello-world/flexible directory:
    gcloud app deploy
    Learn about the optional flags.
  2. Launch your browser and view the app at http://YOUR_PROJECT_ID.appspot.com, by running the following command:
    gcloud app browse
This time, the page that displays the Hello World message is delivered by a web server running on an App Engine instance. Congratulations! You've deployed your first Node.js app to App Engine flexible environment!
See the following sections for information about cleaning up as well as links to the possible next steps that you can take.

Clean up

To avoid incurring charges, you can delete your GCP project to stop billing for all the resources used within that project.
  1. In the GCP Console, go to the Projects page. Go to the Projects page
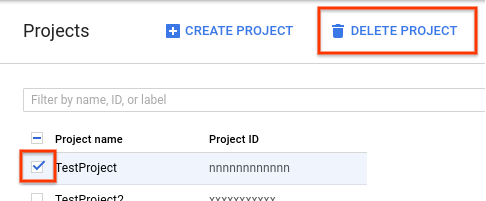
  2. In the project list, select the project you want to delete and click Delete project. After selecting the checkbox next to the project name, click
      Delete project
  3. In the dialog, type the project ID, and then click Shut down to delete the project.

What's next

Learn the whole platform

Now that you know what it's like to develop and deploy App Engine apps, you can stretch out and see the rest of Google Cloud Platform. You already have the Google Cloud SDK installed and that gives you the tools to interact with products like Google Cloud SQL, Google Cloud Storage, Google Cloud Datastore, and more. For a guided walkthrough that teaches you how to create an application that uses the entire platform, not just App Engine, check out our quickstart on creating the Bookshelf app.

Learn about the App Engine flexible environment

Here are some topics to help continue your learning about App Engine.

Hello World code review

Hello World is the simplest possible App Engine app, as it contains only one service, has only one version, and all of the code is located within the app's root directory. This section describes each of the app files in detail.

app.js

The app.js file contains the JavaScript code to start a server and respond to requests.
The following code responds to requests from web clients by displaying the 'Hello World' message, via a server that runs on port 8080.
const express = require('express');
const app = express();

app.get('/', (req, res) => {
  res.status(200).send('Hello, world!').end();
});
// Start the server
const PORT = process.env.PORT || 8080;
app.listen(PORT, () => {
  console.log(`App listening on port ${PORT}`);
  console.log('Press Ctrl+C to quit.');
});

app.yaml

The app.yaml file describes an application's deployment configuration:
runtime: nodejsenv: flex
# This sample incurs costs to run on the App Engine flexible environment. 
# The settings below are to reduce costs during testing and are not appropriate
# for production use. For more information, see:
# https://cloud.google.com/appengine/docs/flexible/nodejs/configuring-your-app-with-app-yaml
manual_scaling:  instances: 1resources:  cpu: 1
  memory_gb: 0.5
  disk_size_gb: 10
Here, app.yaml specifies the runtime used by the app, and sets env: flex, specifying that the app uses the flexible environment.

package.json

package.json is used to specify application dependencies, node version, and application startup.
{
  "name": "appengine-hello-world",
  "description": "Simple Hello World Node.js sample for Google App Engine Flexible Environment.",
  "version": "0.0.1",
  "private": true,
  "license": "Apache-2.0",
  "author": "Google Inc.",
  "repository": {
    "type": "git",
    "url": "https://github.com/GoogleCloudPlatform/nodejs-docs-samples.git"
  },
  "engines": {
    "node": ">=4.3.2"
  },
  "scripts": {
    "deploy": "gcloud app deploy",
    "start": "node app.js",
    "lint": "repo-tools lint",
    "pretest": "npm run lint",
    "system-test": "repo-tools test app",
    "test": "npm run system-test",
    "e2e-test": "repo-tools test deploy"
  },
  "dependencies": {
    "express": "4.16.2"
  },
  "devDependencies": {
    "@google-cloud/nodejs-repo-tools": "2.2.1"
  },
  "cloud-repo-tools": {
    "test": {
      "app": {
        "msg": "Hello, world!"
      }
    },
    "requiresKeyFile": true,
    "requiresProjectId": true
  }
}
This package.json specifies that the application uses Node.js v4.3.2 or later, depends on express, and that node app.js is used to start the application. For more details about how your application is installed and run, see the Node.js runtime documentation.

GCP - App Engine - Quickstart (Node.js)

Introduction

In this tutorial, you'll deploy a sample Node.js application to Google App 
By the end, you'll have learned how to:
  • Configure Deployments
    Learn how to edit a YAML file to edit a deployment’s configuration
  • Deploy apps with Google Cloud Shell
    Deploy with Cloud Shell, a web-based command line tool
This is a real App Engine deployment, so when the tutorial is over you can keep working on it.

Using Google Cloud Shell

Cloud Shell is a built-in command line tool for the console. We're going to use Cloud Shell to deploy our app.
  1. Open Google Cloud Shell
  2. Clone the sample code
    Use Cloud Shell to clone and navigate to the "Hello World" code. The sample code is cloned from your project repository to the Cloud Shell.
    In Cloud Shell enter:
    Clone a sample repository:
    TUTORIALDIR=src/crawler-20180523/nodejs_mvms_quickstart-2018-05-23-14-42
git clone https://github.com/GoogleCloudPlatform/nodejs-getting-started.git $TUTORIALDIR
Switch to the tutorial directory:
cd $TUTORIALDIR/1-hello-world

Configuring your deployment

You are now in the main directory for the sample code. We'll look at the files that configure your application.

The app.js file contains the JavaScript code to start a server and respond to requests.
The following code responds to requests from web clients by displaying the Hello World message, via a server that runs on port 8080.

Google App Engine uses YAML files to specify a deployment's configuration. app.yaml files contain information about your application, like the runtime environment, URL handlers, and more.


Testing your app

    Install npm packages
    We will install the npm packages on Cloud Shell in order to test run the Node.js app.
    To install npm packages, enter:
    npm install
  1. Test your app on Cloud Shell
    Cloud Shell lets you test your app before deploying to make sure it's running as intended, just like debugging on your local machine.
    To test your app enter:
    export PORT=8080
    npm start
  2. Preview your app with "Web preview"
    Your app is now running on Cloud Shell. You can access the app by using "Web preview" to connect to port 8080.
  3. Terminating the preview instance
    Terminate the instance of the application by pressing Ctrl+C in the Cloud Shell.

    Last steps

    Ensuring Compute Engine is initialized
    Compute Engine needs a few moments to initialize. The tutorial will continue automatically once it's ready.
    Deploying with Cloud Shell
    You can use Cloud Shell to deploy your app. To deploy your app enter:
    gcloud app deploy --project crawler-20180523
    Visit your app
    Congratulations! Your app has been deployed. The default URL of your app is crawler-20180523.appspot.com  Click the URL to visit it.
    The app is now running in the cloud. We will show you how to delete the project to avoid potential charges. 
    1. You can check in on your app by monitoring its status on the App Engine dashboard.
      Open the menu on the left side of the console.
      Then, select the App Engine section.

    Congratulations

    You have successfully deployed an App Engine application! Here are some next steps:
      1. Delete your tutorial project You should delete your project  to avoid additional charges.
      2. Download the Google Cloud SDK and develop locally
    1. After it downloads, extract the file  and initialize the SDK .
    2. Build your next application Learn how to use App Engine with other Cloud Platform products:


    Use MongoDB

    Deploy MongoDB on Compute Engine or use a managed, MongoDB service. 

    Learn to use Cloud Storage

    Cloud Storage is a powerful and simple object storage service.
     

Wednesday, December 20, 2017

GCP - App Engine - Quickstart (Java)

Introduction

This tutorial shows you how to deploy a sample Java  application to Google App Engine using the App Engine Maven plugin.
Here are the steps you will be taking.
  • Build and run your "Hello, world!" app
    You will learn how to run your app using Google Cloud Shell, right in your browser. At the end you'll deploy your app to the web using the App Engine Maven plugin.
  • After the app...
    Your app will be real and you'll be able to experiment with it after you deploy, or you can remove it and start fresh.

Using Google Cloud Shell

Cloud Shell is a built-in command line tool for the console. We're going to use Cloud Shell to deploy our app.
  1. Open Google Cloud Shell
    Open Cloud Shell by clicking
    from the navigation bar at the top. show me how
  2. Clone the sample code
    Use Cloud Shell to clone and navigate to the "Hello World" code. The sample code is cloned from your project repository to the Cloud Shell.
    In Cloud Shell enter:
    Clone a sample repository:
    TUTORIALDIR=src/crawler-188409/java_gae_quickstart-2017-12-21-14-03
git clone https://github.com/GoogleCloudPlatform/appengine-try-java.git $TUTORIALDIR
Switch to the tutorial directory:
cd $TUTORIALDIR
 

Configuring your deployment


  1. You are now in the main directory for the sample code. We'll look at the files that configure your application.
    1. Exploring the application
      Enter the following command to view your application code:
      cat src/main/java/myapp/DemoServlet.java
  2. This servlet responds to any request by sending a response containing the message Hello, world!.
  3. Exploring your configuration
    For Java, Google App Engine uses XML files to specify a deployment's configuration.
    Enter the following command to view your configuration file:
    cat pom.xml
  4. The helloworld app uses Maven, which means you must specify a Project Object Model, or POM, which contains information about the project and configuration details used by Maven to build the project.

 Testing your app

    1. Test your app on Cloud Shell
      Cloud Shell lets you test your app before deploying to make sure it's running as intended, just like debugging on your local machine.
      To test your app enter:
      mvn appengine:run
  1. Preview your app with "Web preview"
    Your app is now running on Cloud Shell. You can access the app by using "Web preview" to connect to port 8080. show me how
  2. Terminating the preview instance
    Terminate the instance of the application by pressing Ctrl+C in the Cloud Shell

    Create the application

    In order to deploy our app, we need to create an App Engine application. This sets up the app and selects a region.
    To create your app enter:
    gcloud app create

      Last steps

      1. Deploying with Cloud Shell
        You can use Cloud Shell to deploy your app. To deploy your app enter:
        gcloud config set project crawler-188409
      mvn appengine:deploy
    1. Visit your app
      Congratulations! Your app has been deployed. The default URL of your app is crawler-188409.appspot.com  Click the URL to visit it.
    2. View your app's status
      You can check in on your app by monitoring its status on the App Engine dashboard.
      Open the menu on the left side of the console.
      Then, select the App Engine section.

        Congratulations

        You have successfully deployed an App Engine application! Here are some next steps:
        1. Download the Google Cloud SDK and develop locally
      1. After it downloads, extract the file  and initialize the SDK .
      2. Build your next application Learn how to use App Engine with other Cloud Platform products:Learn to use Cloud Datastore Cloud Datastore is a highly-scalable NoSQL database for your applications.

        Learn to use Cloud Datastore

        Cloud Datastore is a highly-scalable NoSQL database for your applications. 

        Learn to use Cloud Storage

        Cloud Storage is a powerful and simple object storage service.
         
        .

Monday, December 11, 2017

Securely Connecting to VM Instances on GCE (GCP compute engine)

When developing projects on Google Compute Engine, there are a variety of scenarios in which you want to keep the instances from being reached from the public Internet:
  • Web services are still under development and not ready to be exposed to external users because they are feature incomplete or have not yet been configured with HTTPS.
  • Instance might be providing services designed to be only consumed by other instances in the project.
  • Instances should only be reached through dedicated interconnect options from company offices or data centers.
Even when a service is intentionally Internet-facing, it is important that communication with the service be restricted to the target user groups, and occur over secure channels, such as SSH or HTTPS, to protect sensitive information.
This article demonstrates several methods for securing communications with Compute Engine instances with or without external IP addresses.

Protecting services on machines with external IP addresses

Connecting to instances without external IP addresses

Protecting services on machines with external IP addresses

When instances have a public IP address, it is important that only the services and traffic you intend to be exposed are reachable, and for those that are exposed, any sensitive information is secured in transit.

Firewalls

Your first line of defense is to restrict who can reach the instance using firewalls. By creating firewall rules, you can restrict all traffic to a network or target machines on a given set of ports to specific source IP addresses.
Firewalls are not a standalone solution. Restricting traffic to specific source IPs does not protect sensitive information, such as login credentials, commands that create or destroy resources or files, or logs. When running a web service on a publicly-accessible machine, such as a Google Compute Engine instance with an external IP, you need to encrypt all communication between your host and the deployed instance to ensure proper security.
In addition, firewalls aren't always the appropriate solution. For example, firewalls are not ideal for development environments that do not have static IP addresses, such as roaming laptops.

HTTPS and SSL

For production web systems, you should configure HTTPS/SSL. HTTPS/SSL can be set up either by setting up an instance to terminate HTTPS or by configuring HTTPS load balancing. HTTPS/SSL does involve some initial complexity, requiring you to perform the following tasks:
If you have set up SSL-serving domains before, it should be straightforward to do the same with Google Compute Engine. If not, you might find it easier to use a different security method, such as port forwarding or SOCKS proxy.

Port forwarding over SSH

You can use the gcloud command-line tool to start a server on a given local port that forwards all traffic to a remote host over an SSH connection.
First, take note of the instance and port that are providing the service to which you would like to establish a secure connection. Next, run the following command:
gcloud compute ssh example-instance \
    --project my-project \
    --zone us-central1-a \
    --ssh-flag="-L" \
    --ssh-flag="2222:localhost:8888"
In the above command, the parameters are defined as follows:
  • example-instance is the name of the instance to which you'd like to connect.
  • my-project is your Google Cloud Platform project ID.
  • us-central1-a is the zone in which your instance is running.
  • 2222 is the local port you're listening on.
  • 8888 is the remote port you're connecting to.
With these example settings, if you open http://localhost:2222/ in your browser, the HTTP connection will go over the SSH tunnel you have just created over to your remote host and connect to the specified instance via SSH and then connect to port 8888 on the same machine, but over an encrypted, secure SSH connection.
The gcloud command creates and maintains an SSH connection, and this approach only works while the SSH session is active. As soon as you exit the SSH session that gcloud creates, port forwarding via http://localhost:2222/ will stop working.
If you want to create more than one port forwarding rule, you can specify multiple rules on a single command line by repeating the flags:
gcloud compute ssh example-instance \
    --project my-project \
    --zone us-central1-a \
    --ssh-flag="-L" \
    --ssh-flag="2222:localhost:8888" \
    --ssh-flag="-L" \
    --ssh-flag="2299:localhost:8000"
Alternatively, you can run a new gcloud command each time to create a separate tunnel. Note that you cannot add or remove port forwarding from an existing connection without exiting and re-establishing the connection from scratch.

SOCKS proxy over SSH

If you want to connect to a number of different hosts in your cloud deployment, the easiest way to do so is to change your browser to do the lookups directly from your network. This approach allows you to use the short name of the hosts instead of looking up each host's IP address, opening up ports for each service, or creating an SSH tunnel for each host/port pair.
The approach that you use here is as follows:
  1. Set up a single SSH tunnel to one of the hosts on the network, and create a SOCKS proxy on that host.
  2. Change the browser configuration to do all the lookups via that SOCKS proxy host.
Note that because you are tunneling all traffic via that host, you don't want to browse the web in general using that browser or that specific profile, as you will use your cloud service's bandwidth for this. In general, you might want to use a separate browser profile and switch to it when necessary.

Start the SOCKS proxy

To start your SOCKS proxy, run the following command:
gcloud compute ssh example-instance \
    --project my-project \
    --zone us-central1-a \
    --ssh-flag="-D" \
    --ssh-flag="1080" \
    --ssh-flag="-N"
In the above command, the parameters are defined as follows:
  • example-instance is the name of the instance to which you would like to connect.
  • my-project is your Google Cloud Platform project ID.
  • us-central1-a is the zone in which your instance is running.
  • 1080 is the local port you're listening on.
Note that, in this case, you don't need to specify a remote port. Because a SOCKS proxy does not bind to any specific remote port, any connection you make via the SOCKS proxy will be resolved relative to the host you connect to.
By using a SOCKS proxy, you can connect to any instance that shares a Compute Engine network with your proxy instance by using the instance's short name. In addition, you can connect to any port on a given instance.
This approach is much more flexible than the simple port-forwarding method, but will also require you to change the settings in your web browser to utilize the proxy.
Next, configure your browser to use the proxy.

Chrome setup for SOCKS proxy

Chrome uses system-wide proxy settings by default, so you need to specify a different proxy using command-line flags. Launching Chrome by default creates an instance of an already-running profile, so to enable you to run multiple copies of Chrome simultaneously, one which is using the proxy and others which are not, you need a new profile.
Launch Chrome using a new profile. It will be created automatically if it does not exist.
Linux:
/usr/bin/google-chrome \
    --user-data-dir="$HOME/chrome-proxy-profile" \
    --proxy-server="socks5://localhost:1080"
Mac OS X:
"/Applications/Google Chrome.app/Contents/MacOS/Google Chrome" \
    --user-data-dir="$HOME/chrome-proxy-profile" \
    --proxy-server="socks5://localhost:1080"
Windows:
"C:\Program Files (x86)\Google\Chrome\Application\chrome.exe" ^
    --user-data-dir="%USERPROFILE%\chrome-proxy-profile" ^
    --proxy-server="socks5://localhost:1080"
Be sure to set the localhost port to the same value that you used in the gcloud command earlier (1080 in our example).

Firefox setup for SOCKS proxy

Before changing these settings, you may want to create a new Firefox profile. Otherwise, it will affect all instances of Firefox to use that host as a proxy, which is very likely not what you want.
After you have Firefox running with a separate profile, you can set up the SOCKS proxy:
  1. Open Preferences.
  2. Click Advanced > Networks > Settings to open the Connection Settings dialog.
  3. Choose the option Manual proxy configuration
    • In the SOCKS Host section, fill in localhost as the host and the port you selected when you ran the gcloud command earlier.
    • Choose SOCKS v5.
    • Check the box Remote DNS.
    • Leave all other entries blank.
  4. Click OK and close the Preferences dialog box.

Connecting to instances without external IP addresses

When instances do not have external IP addresses they can only be reached by other instances on the network, or via managed VPN gateway. You can provision instances in your network to act as trusted relays for inbound connections (bastion hosts) or network egress (NAT Gateways). For more transparent connectivity without setting up such connections, you can use a managed VPN gateway resource.

Bastion hosts

Bastion hosts provide an external facing point of entry into a network containing private network instances. This host can provide a single point of fortification or audit and can be started and stopped to enable or disable inbound SSH communication from the Internet.
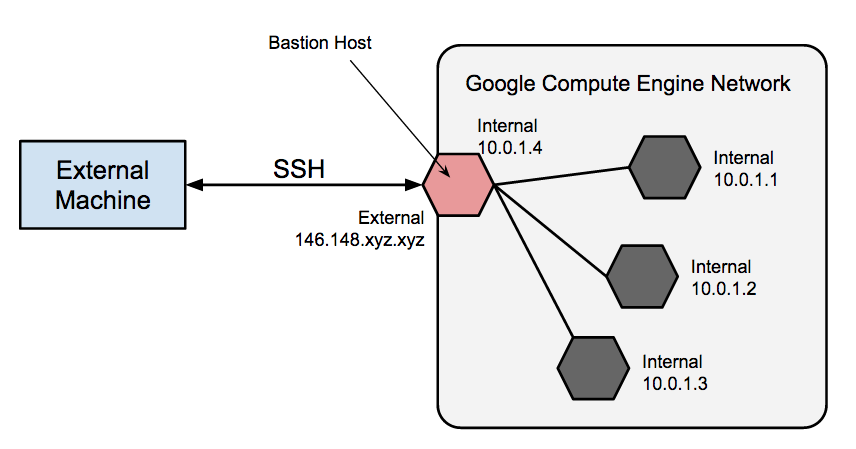
Bastion Architecture
By using a bastion host, you can connect to an instance that does not have an external IP address. This approach allows you to connect to a development environment or manage the database instance for your external application, for example, without configuring additional firewall rules.
A complete hardening of a bastion host is outside the scope of this article, but some initial steps taken can include:
  • Limit the CIDR range of source IPs that can communicate with the bastion.
  • Configure firewall rules to allow SSH traffic to private instances from only the bastion host.
By default, SSH on instances is configured to use private keys for authentication. When using a bastion host, you log into the bastion host first, and then into your target private instance. Because of this two-step login, which is why bastion hosts are sometimes called "jump servers," you should use ssh-agent forwarding instead of storing the target machine's private key on the bastion host as a way of reaching the target machine. You need to do this even if using the same key-pair for both bastion and target instances, as the bastion has direct access to only the public half of the key-pair.
To learn how to use a bastion host instance to connect to other instances on your Cloud Platform network, read Connecting to instances that do not have external IP addresses.

VPN

Cloud VPN lets you connect your existing network to your Google Cloud Platform network via an IPsec connection to a VPN gateway device. This allows direct routing of traffic from your premises to the private IP interfaces of Compute Engine instances. Traffic is encrypted as it transits over public links to Google.
For details on setting up, configuring, and using VPN with Compute Engine, see the Cloud VPN documentation.
To learn how to connect to instances on your Cloud Platform network through an existing VPN rather than through external IP addresses of instances, read Connecting to instances that do not have external IP addresses.

Traffic egress using NAT gateways

When an instance does not have an external IP address assigned it can not make direct connections to external services, including other Cloud Platform services. To allow these instances to reach services on the public Internet, you can set up and configure a NAT gateway machine, which can route traffic on behalf of any instance on the network. Be aware that a single instance should not be considered highly available, and can not support high traffic throughput for multiple instances.

Interactive serial console access

When an instance doesn't have an external IP address, you might still need to interact with the instance for troubleshooting or maintenance purposes. Setting up a Bastion host is one option but might require more setup than worthwhile for your needs. If you want to troubleshoot an instance without an external IP address, consider enabling interactive access on the serial console, which allows you to interact with an instance's serial console using SSH and run commands against the serial console.

Sunday, December 10, 2017

GCP - Compute Engine - Quickstart

Build a to-do app with MEAN

15 minutes
In this quickstart, you'll use Compute Engine to create a two-tier application. The front-end VM runs a Node.js todo web app, and the back-end VM runs MongoDB.
This tutorial will walk you through:
  • Creating and configuring two VMs
  • Setting up firewall rules
  • Using SSH to install packages on your VMs

Create a back-end VM

First, create the back-end VM that runs MongoDB. This server stores the to-do items.
  1. Click the Create instance button
    Click the Create instance button.
  2. Name the instance
    Enter a name (for example, "back-end") for this instance and press the Tab key to move to the next step
  3. Select the machine type
    Select f1-micro . This will incur fewer charges. Learn more about pricing 
  4. Select the boot disk image
    Select Ubuntu 14.04 LTS as your boot disk image for this tutorial.
  5. Open HTTP firewall port
    Open HTTP firewall port
    Check Allow HTTP traffic. This is an easy way to open firewall 80 (HTTP) so the front-end and back-end VMs can communicate
  6. Create the VM
    Create the VM
    Click Create to finish creating this instance

Create a front-end VM

While the back-end VM is spinning up, create the front-end VM that runs the Node.js todo application
  1. Create the front-end VM
    Click Create Instance to create the front-end VM
  2. Name the instance
    Enter a name (for example, "front-end") for this instance and press the Tab key to move to the next step
  3. Select the machine type
    Select f1-micro . This will incur fewer charges. Learn more about pricing 
  4. Select the boot disk image
    Select Ubuntu 14.04 LTS as your boot disk image for this tutorial.
  5. Open HTTP firewall port
    Open HTTP firewall port
    Check Allow HTTP traffic. This is an easy way to open firewall 80 (HTTP) so the front-end and back-end VMs can communicate
  6. Create the VM
    Create the VM
    Click Create to finish creating this instance

Install and run the back-end database (1)

  1. SSH into the VM
    SSH into the VM
    Next to your back-end VM, click SSH to open a terminal window in your browser
  2. Install and run the database
    Install and run the database
    Go to the terminal window and enter the commands to install and run MongoDB

Install and run the back-end database (terminal window)

Enter these commands to install and run MongoDB. You can use the keyboard to copy and paste each command line. Click Done when you finish entering all the commands to close the SSH window.
Update packages and install MongoDB. When asked if you want to continue, type 'Y'.


$ sudo apt-get update
$ sudo apt-get install mongodb
The MongoDB service started when you installed it. You must stop it so you can change how it runs.
$ sudo service mongodb stop


Create a directory for MongoDB and then run the MongoDB service in the background on port 80.
$ sudo mkdir $HOME/db ; sudo mongod --dbpath $HOME/db --port 80 --fork --logpath /var/tmp/mongodb
  
After you enter the final command, click Done and then confirm that you want to leave the page to close the SSH browser window.
 

Install and run the web app on your front-end VM

The MongoDB back-end server is running, so it is time to install the front-end web application
  1. SSH into the VM
    SSH into the VM
    Next to your front-end VM, click SSH to open a terminal window in your browser
  2. Install and run the web app on your front-end VM
    Install and run the web app on your front-end VM
    Go to the terminal window and enter the commands to install and run the sample todo app

Install and run the web app on your front-end VM (terminal window)

Enter these commands to install the todo web application. You can use the keyboard to copy and paste each command line. Click Done when you finished entering all the commands to close the SSH window.
Update packages and install git, Node.js and npm. When asked if you want to continue, type 'Y'.


$ sudo apt-get update

$ curl -sL https://deb.nodesource.com/setup_6.x | sudo -E bash -

$ sudo apt-get install git nodejs

Clone the sample application and install application dependencies.
$ git clone https://github.com/GoogleCloudPlatform/todomvc-mongodb.git
$ cd todomvc-mongodb; npm install

Start the todo web application. Note: The IP addresses below are internal IPs for communication between servers. You can find these IP addresses on each server’s details page.

$ nohup nodejs server.js --be_ip 10.142.0.2 --fe_ip 10.142.0.3 &

After you enter the final command, click Done and then confirm that you want to leave the page to close the SSH browser window.

You're done

Your app is running at http://35.185.117.209:8080
The quickstart servers continue running until you remove them. This can reduce your available quotas.