heroku config:set key=value
heroku config
heroku config:unset key
Wednesday, July 10, 2019

Saturday, July 6, 2019
Deployment to Heroku (using Heroku CLI)
//package.json
"scripts": {
 "start":"node path/to/your/app.js"
 },
//app.js
const port = process.env.PORT || 3000
const app = express()
...
app.listen(port, () => {
 console.log('server up on port ' + port)
})
heroku login
heroku keys:add // add ssh public key to heroku
git init
git add .
git commit -m "your comment comes here"
heroku create your-project-name // create a project on heroku
heroku git:remote -a tecknovice-weather-server // add remote branch
heroku buildpacks:set heroku/nodejs //or any another language
git push heroku master //push code from local to remote branch
heroku logs --tail // for real time logging
Tuesday, May 29, 2018
Google Cloud Translate Sample
Java Version
This sample requires you to have Java8.Download Maven
This sample uses the Apache Maven build system. Before getting started, be sure to download and install it. When you use Maven as described here, it will automatically download the needed client libraries.Authentication
This sample uses API Key for authentication.- Visit the Google Cloud Console and navigate to:
API Manager > Credentials > Create credentials > API Key
- Set the environment variable
GOOGLE_API_KEY
export GOOGLE_API_KEY=<YOUR_PROJECT_API_KEY>
Download Source code
git clonehttps://github.com/GoogleCloudPlatform/java-docs-samples.git
cdjava-docs-sample/translate
Run the sample
To build the sample, we use Maven.mvn clean compile assembly:single
java command. The variable
$COMMAND takes three values langsupport, detect and translate.JAR_FILE=target/translate-1.0-jar-with-dependencies.jar
java -jar $JAR_FILE <detect|translate|langsupport> <text>
<optional_source> <optional_target>
INPUT="A quick brown fox jumped over a lazy dog."
SOURCE_LANG="en"
TARGET_LANG="fr"
-
List the languages supported by the API
java -jar $JAR_FILE langsupport -
List the languages supported for given target language
java -jar $JAR_FILE langsupport $TARGET_LANG -
Detect input text language
java -jar $JAR_FILE detect "$INPUT" -
Translate input text (with options)
java -jar $JAR_FILE translate "$INPUT"
java -jar $JAR_FILE translate "$INPUT" $SOURCE_LANG $TARGET_LANG
Translation API Client Libraries (Java)
Installing the client library
Setting up authentication
To run the client library, you must first set up authentication by creating a service account and setting an environment variable.GCP Console
-
Go to the Create service account key page in the
GCP Console.
Go to the Create Service Account Key page - From the Service account drop-down list, select New service account.
- Enter a name into the Service account name field.
- From the Role drop-down list, select Project > Owner.
Note: The Role field authorizes your service account to access resources. You can view and change this field later using GCP Console. If you are developing a production application, specify more granular permissions than Project > Owner. For more information, see granting roles to service accounts. - Click Create. A JSON file that contains your key downloads to your computer.
Enviroment Variables
Provide authentication credentials to your application code by setting the environment variable GOOGLE_APPLICATION_CREDENTIALS. Replace [PATH] with the file path of the JSON file that contains your service account key, and [FILE_NAME] with the filename.
Clone source
git clone https://github.com/GoogleCloudPlatform/java-docs-samples.git
cd ./java-docs-samples/translate/cloud-client
Build your project with:
mvn clean package -DskipTests
ClassName via:mvn exec:java -Dexec.mainClass=com.example.translate.ClassName \
-DpropertyName=propertyValue \
-Dexec.args="any arguments to the app"
Translate a string (using the quickstart sample)
mvn exec:java -Dexec.mainClass=com.example.translate.QuickstartSample
Quickstart Google Cloud Translation API
This page shows how to make a Google Cloud Translation API request with
curl.Before you begin
-
Set up a GCP Console project.
Set up a project
Click to:
- Create or select a project.
- Enable the Cloud Translation API for that project.
- Create a service account.
- Download a private key as JSON.
- Install and initialize the Cloud SDK.
-
Provide authentication credentials to your application code by
running the following command.
Replace
[PATH]with the location of the JSON file that contains your credentials.
gcloud auth activate-service-account --key-file=[PATH]
Make a Translation API request
Make a Translation API Request using a REST method call to thev2
translate method.-
Use
curlto make a request to thehttps://translation.googleapis.com/language/translate/v2endpoint.
Thecurlcommand includes JSON with the text to be translated (q), the language to translate from (source), and the language to translate to (target).
The source and target languages are identified using the iso-639-1 codes. The source language is English (en) and the target language is Spanish (es). The format of the query is noted as "text" for plain text.
The samplecurlcommand uses thegcloud auth print-access-tokencommand to get an authentication token.curl -s -X POST -H "Content-Type: application/json" \ -H "Authorization: Bearer "$(gcloud auth print-access-token) \ --data "{ 'q': 'The Great Pyramid of Giza (also known as the Pyramid of Khufu or the Pyramid of Cheops) is the oldest and largest of the three pyramids in the Giza pyramid complex.', 'source': 'en', 'target': 'es', 'format': 'text' }" "https://translation.googleapis.com/language/translate/v2"
You should see a response similar to the following:
{
  "data": {
    "translations": [
      {
        "translatedText": "La Gran Pirámide de Giza (también conocida como la
         Pirámide de Khufu o la Pirámide de Keops) es la más antigua y más
         grande de las tres pirámides en el complejo de la pirámide de Giza."
      }
    ]
  }
}
Clean up
To avoid unnecessary Google Cloud Platform charges, use the GCP Console to delete your project if you do not need it.Wednesday, May 23, 2018
Quickstart for Node.js in the App Engine Flexible Environment
This quickstart shows you how to create a small App Engine application that
displays a short message.
Download the sample app and navigate into the app directory:
In your terminal window, press Ctrl+C to exit the web server.
See the following sections for information about cleaning up as well as links to the possible next steps that you can take.
The
The following code responds to requests from web clients by displaying the 'Hello World' message, via a server that runs on port 8080.
The
Here,
This package.json specifies that the application uses Node.js v4.3.2 or later, depends on express, and that
Before you begin
Before running and deploying this sample, take the following steps:-
Use the GCP Console to create a new GCP project,
create an App Engine application, and enable billing:
Go to App Engine When prompted, select the region where you want your App Engine application located and then enable billing.
- Install the following prerequisites
locally:
- Download and install git.
- Prepare your environment for Node.js development.
-
Download and install the Google Cloud SDK and then initialize the
gcloudtool:
Download the SDK
-
Alternatively: You can use
Google Cloud Shell, which
comes with git and Cloud SDK already installed, and
many other features, such as language
support and code editors.
After Google Cloud Shell is launched, you can proceed with the rest
of this tutorial and execute your commands within Cloud Shell.
Download the Hello World app
We've created a simple Hello World app for Node.js so you can quickly get a feel for deploying an app to the App Engine flexible environment. Follow these steps from a command line to download Hello World to your local machine.Download the sample app and navigate into the app directory:
-
Clone the Hello World sample app repository to your local machine:
Alternatively, you can download the sample as a zip file and extract it.git clone https://github.com/GoogleCloudPlatform/nodejs-docs-samples
-
Change to the directory that contains the sample code:
cd nodejs-docs-samples/appengine/hello-world/flexible
Run Hello World on your local machine
-
Install dependencies for this project by entering the following command:
or if you are using Yarn:npm install
yarn install -
Run the start script.
or if you are using Yarn:npm start
yarn start -
View your app in your web browser:
-
If you are using Cloud Shell, in the toolbar, click
Web Preview
 and
select Preview on port 8080 instead.
and
select Preview on port 8080 instead.
-
If you are not using Cloud Shell, enter the following address:
http://localhost:8080
-
If you are using Cloud Shell, in the toolbar, click
Web Preview
In your terminal window, press Ctrl+C to exit the web server.
Deploy and run Hello World on App Engine
To deploy your app to the App Engine flexible environment:- Deploy the Hello World app by running the following
command
from the
hello-world/flexibledirectory:
gcloud app deployLearn about the optional flags. -
Launch your browser and view the app at
http://YOUR_PROJECT_ID.appspot.com, by running the following command:
gcloud app browse
See the following sections for information about cleaning up as well as links to the possible next steps that you can take.
Clean up
To avoid incurring charges, you can delete your GCP project to stop billing for all the resources used within that project.-
In the GCP Console, go to the Projects page.
Go to the Projects page
-
In the project list, select the project you
want to delete and click Delete project.
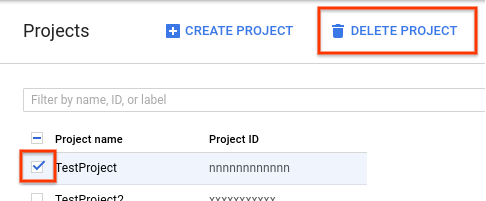
- In the dialog, type the project ID, and then click Shut down to delete the project.
What's next
Learn the whole platform
Now that you know what it's like to develop and deploy App Engine apps, you can stretch out and see the rest of Google Cloud Platform. You already have the Google Cloud SDK installed and that gives you the tools to interact with products like Google Cloud SQL, Google Cloud Storage, Google Cloud Datastore, and more. For a guided walkthrough that teaches you how to create an application that uses the entire platform, not just App Engine, check out our quickstart on creating the Bookshelf app.Learn about the App Engine flexible environment
Here are some topics to help continue your learning about App Engine.Hello World code review
Hello World is the simplest possible App Engine app, as it contains only one service, has only one version, and all of the code is located within the app's root directory. This section describes each of the app files in detail.
app.js
The app.js file contains the JavaScript code to start a server and respond to
requests.The following code responds to requests from web clients by displaying the 'Hello World' message, via a server that runs on port 8080.
app.yaml
The app.yaml
file describes an application's deployment configuration:Here,
app.yaml specifies the runtime used by
the app, and sets env: flex, specifying that the app
uses the flexible environment.-
For more information on how the Node.js runtime works, see
The Node.js Runtime.
-
For more details about how to design your app to take advantage of versions
and services, see An Overview of App
Engine.
-
For more details about the configuration settings for App Engine, see
Configuring Your App with
app.yaml.
package.json
package.json is used to
specify application dependencies, node version, and application startup.This package.json specifies that the application uses Node.js v4.3.2 or later, depends on express, and that
node app.js is
used to start the application. For more details about how your application is
installed and run, see the Node.js runtime
documentation.GCP - App Engine - Quickstart (Node.js)
Introduction
In this tutorial, you'll deploy a sample Node.js application to Google AppBy the end, you'll have learned how to:
- Configure Deployments
Learn how to edit a YAML file to edit a deployment’s configuration - Deploy apps with Google Cloud Shell
Deploy with Cloud Shell, a web-based command line tool
Using Google Cloud Shell
Cloud Shell is a built-in command line tool for the console. We're going to use Cloud Shell to deploy our app.- Open Google Cloud Shell
- Clone the sample codeUse Cloud Shell to clone and navigate to the "Hello World" code. The sample code is cloned from your project repository to the Cloud Shell.
In Cloud Shell enter:
Clone a sample repository:
TUTORIALDIR=src/crawler-20180523/nodejs_mvms_quickstart-2018-05-23-14-42
git clone https://github.com/GoogleCloudPlatform/nodejs-getting-started.git $TUTORIALDIRcd $TUTORIALDIR/1-hello-worldConfiguring your deployment
You are now in the main directory for the sample code. We'll look at the files that configure your application.The
app.js file contains the JavaScript code to start a server and respond to requests.The following code responds to requests from web clients by displaying the
Hello World message, via a server that runs on port 8080.Google App Engine uses YAML files to specify a deployment's configuration.
app.yaml files contain information about your application, like the runtime environment, URL handlers, and more.Testing your app
- Test your app on Cloud ShellCloud Shell lets you test your app before deploying to make sure it's running as intended, just like debugging on your local machine.
To test your app enter:
export PORT=8080 npm start - Preview your app with "Web preview"Your app is now running on Cloud Shell. You can access the app by using "Web preview" to connect to port 8080.
- Terminating the preview instanceTerminate the instance of the application by pressing Ctrl+C in the Cloud Shell.
Last steps
Ensuring Compute Engine is initializedCompute Engine needs a few moments to initialize. The tutorial will continue automatically once it's ready.Deploying with Cloud ShellYou can use Cloud Shell to deploy your app. To deploy your app enter:
gcloud app deploy --project crawler-20180523Visit your appCongratulations! Your app has been deployed. The default URL of your app is crawler-20180523.appspot.com Click the URL to visit it.
- You can check in on your app by monitoring its status on the App Engine dashboard.
Open the menu on the left side of the console.
Then, select the App Engine section.
Congratulations
You have successfully deployed an App Engine application! Here are some next steps:
Use MongoDB
Deploy MongoDB on Compute Engine or use a managed, MongoDB service.Learn to use Cloud Storage
Cloud Storage is a powerful and simple object storage service. -
Install npm packages
We will install the npm packages on Cloud Shell in order to test run the Node.js app.
To install npm packages, enter:
To install npm packages, enter:
npm install
Subscribe to:
Posts (Atom)