Google Compute Engine (GCE) is the
Infrastructure as a Service (IaaS) component of
Google Cloud Platform which is built on the global infrastructure that runs Google’s search engine,
Gmail,
YouTube and other services. Google Compute Engine enables users to launch
virtual machines
(VMs) on demand. VMs can be launched from the standard images or custom
images created by users. GCE users need to get authenticated based on
OAuth 2.0 before launching the VMs. Google Compute Engine can be accessed via the Developer Console,
RESTful API or
command-line interface (CLI).
History
Google announced Compute Engine on June 28, 2012 at
Google I/O
2012 in a limited preview mode. In April 2013, GCE was made available
to customers with Gold Support Package. On February 25, 2013,
Google announced that
RightScale was their first reseller.
[1]
During Google I/O 2013, many features including sub-hour billing,
shared-core instance types, larger persistent disks, enhanced
SDN based networking capabilities and
ISO 27001 certification got announced. GCE became available to everyone on May 15, 2013. Layer 3
load balancing
came to GCE on August 7, 2013. Finally, on December 2, 2013, Google
announced that GCE is generally available. It also expanded the OS
support, enabled live migration of VMs, 16-core instances, faster
persistent disks and lowered the price of standard instances.
At the Google Cloud Platform Live event on March 25, 2014,
Urs Hölzle, Senior VP of technical infrastructure announced sustained usage discounts, support for
Microsoft Windows Server 2008 R2, Cloud
DNS and Cloud Deployment Manager. On May 28, 2014, Google announced optimizations for
LXC containers along with dynamic scheduling of
Docker containers across a fleet of VM instances.
[2]
Google Compute Engine Unit (GCEU)
Google
compute engine unit (GCEU), which is pronounced as GQ, is an
abstraction of compute resources. According to Google, 2.75 GCEUs
represent the minimum power of one logical core (a hardware
hyper-thread) based on the
Sandy Bridge platform.
Persistent disks
Every
Google Compute Engine instance starts with a disk resource called
persistent disk. Persistent disk provides the disk space for instances
and contains the root
filesystem from which the instance boots. Persistent disks can be used as raw
block devices. By default, Google Compute Engine uses
SCSI
for attaching persistent disks. Persistent Disks provide
straightforward, consistent and reliable storage at a consistent and
reliable price, removing the need for a separate local ephemeral disk.
Persistent disks need to be created before launching an instance. Once
attached to an instance, they can be formatted with the native
filesystem. A single persistent disk can be attached to multiple
instances in read-only mode. Each persistent disk can be up to 10TB in
size. Google Compute Engine encrypts the persistent disks with
AES-128-CB,
and this encryption is applied before the data leaves the virtual
machine monitor and hits the disk. Encryption is always enabled and is
transparent to Google Compute Engine users. The integrity of persistent
disks is maintained via a
HMAC scheme.
On June 18, 2014, Google announced support for
SSD persistent disks. These disks deliver up to 30 IOPS per GB which is 20x more write IOPS and 100x more read
IOPS than the standard persistent disks.
Images
An image
is a persistent disk that contains the operating system and root file
system that is necessary for starting an instance. An image must be
selected while creating an instance or during the creation of a root
persistent disk. By default, Google Compute Engine installs the root
filesystem defined by the image on a root persistent disk. Google
Compute Engine provides
CentOS and
Debian images as standard Linux images.
Red Hat Enterprise Linux (RHEL) and
Microsoft Windows Server 2008 R2 images are a part of the premier operating system images which are available for an additional fee.
CoreOS, the lightweight Linux OS based on
Chromium OS is also supported on Google Compute Engine.
Machine types
Google Compute Engine uses
KVM as the
hypervisor,
[3]
and supports guest images running Linux and Microsoft Windows which are
used to launch virtual machines based on the 64 bit x86 architecture.
VMs boot from a persistent disk that has a root filesystem. The number
of virtual CPUs, amount of memory supported by the VM is dependent on
the machine type selected.
Billing and discounts
Once an instance is run for over 25% of a billing cycle, the price starts to drop:
- If an instance is used for 50% of the month, one will get a 10% discount over the on-demand prices
- If an instance is used for 75% of the month, one will get a 20% discount over the on-demand prices
- If an instance is used for 100% of the month, one will get a 30% discount over the on-demand prices
Machine type comparison
Google provides certain types of machine types:
- Standard machine: 3.75 GB of RAM per virtual CPU
- High memory machine: 6.5 GB of RAM per virtual CPU
- High CPU machine: 0.9 GB of RAM per virtual CPU
- Shared machine: CPU and RAM are shared between customers
The prices mentioned below
[citation needed] are based on running standard Debian or CentOS Linux VMs. VMs running proprietary operating systems will be charged more.
| Standard |
n1-standard-1 |
1 |
3.75GB |
$0.070 |
$0.077 |
| Standard |
n1-standard-2 |
2 |
7.5GB |
$0.140 |
$0.154 |
| Standard |
n1-standard-4 |
4 |
15GB |
$0.280 |
$0.308 |
| Standard |
n1-standard-8 |
8 |
30GB |
$0.560 |
$0.616 |
| Standard |
n1-standard-16 |
16 |
60GB |
$1.120 |
$1.232 |
| High Memory |
n1-highmem-2 |
2 |
13GB |
$0.164 |
$0.180 |
| High Memory |
n1-highmem-4 |
4 |
26GB |
$0.328 |
$0.360 |
| High Memory |
n1-highmem-8 |
8 |
52GB |
$0.656 |
$0.720 |
| High Memory |
n1-highmem-16 |
16 |
104GB |
$1.312 |
$1.440 |
| High CPU |
n1-highcpu-2 |
2 |
1.80GB |
$0.088 |
$0.096 |
| High CPU |
n1-highcpu-4 |
4 |
3.60GB |
$0.176 |
$0.192 |
| High CPU |
n1-highcpu-8 |
8 |
7.20GB |
$0.352 |
$0.384 |
| High CPU |
n1-highcpu-16 |
16 |
14.40GB |
$0.704 |
$0.768 |
| Shared Core |
f1-micro |
1 |
0.60GB |
$0.013 |
$0.014 |
| Shared Core |
g1-small |
1 |
1.70GB |
$0.035 |
$0.0385 |
Resources
Compute
Engine connects various entities called resources that will be a part
of the deployment. Each resource performs a different function. When a
virtual machine instance is launched, an instance resource is created
that uses other resources, such as disk resources, network resources and
image resources. For example, a disk resource functions as data storage
for the virtual machine, similar to a physical hard drive, and a
network resource helps regulate traffic to and from the instances.
Image
An image
resource contains an operating system and root file system necessary for
starting the instance. Google maintains and provides images that are
ready-to-use or users can customize an image and use that as an image of
choice for creating instances. Depending on the needs, users can also
apply an image to a persistent disk and use the persistent disk as the
root file system.
Machine type
An instance's machine type determines the number of cores, the memory, and the I/O operations supported by the instance.
Disk
Persistent
disks are independent of the virtual machines and outlive an instance's
lifespan. All information stored on the persistent disks is encrypted
before being written to physical media, and the keys are tightly
controlled by Google.
| Type |
Price (per GB/month) |
| Standard provisioned space |
$0.04 |
| SSD provisioned space |
$0.17 |
| Snapshot storage |
$0.026 |
| IO operations |
No additional charge |
Each instance can attach only a limited amount of total persistent
disk space (one can have up to 64 TB on most instances) and a limited
number of individual persistent disks (one can attach up to 16
independent persistent disks to most instances).
Snapshot
Persistent
disk snapshots lets the users copy data from existing persistent disk
and apply them to new persistent disks. This is especially useful for
creating backups of the persistent disk data in cases of unexpected
failures and zone maintenance events.
Instance
A
Google Compute Engine instance is a virtual machine running on a Linux
or Microsoft Windows configuration. Users can choose to modify the
instances including customizing the hardware, OS, disk, and other
configuration options.
Network
A
network defines the address range and gateway address of all instances
connected to it. It defines how instances communicate with each other,
with other networks, and with the outside world. Each instance belongs
to a single network and any communication between instances in different
networks must be through a public IP address.
Your Cloud Platform Console project can contain multiple networks,
and each network can have multiple instances attached to it. A network
allows you to define a gateway IP and the network range for the
instances attached to that network. By default, every project is
provided with a default network with preset configurations and firewall
rules. You can choose to customize the default network by adding or
removing rules, or you can create new networks in that project.
Generally, most users only need one network, although you can have up to
five networks per project by default.
A network belongs to only one project, and each instance can only
belong to one network. All Compute Engine networks use the IPv4
protocol. Compute Engine currently does not support IPv6. However,
Google is a major advocate of IPv6 and it is an important future
direction.
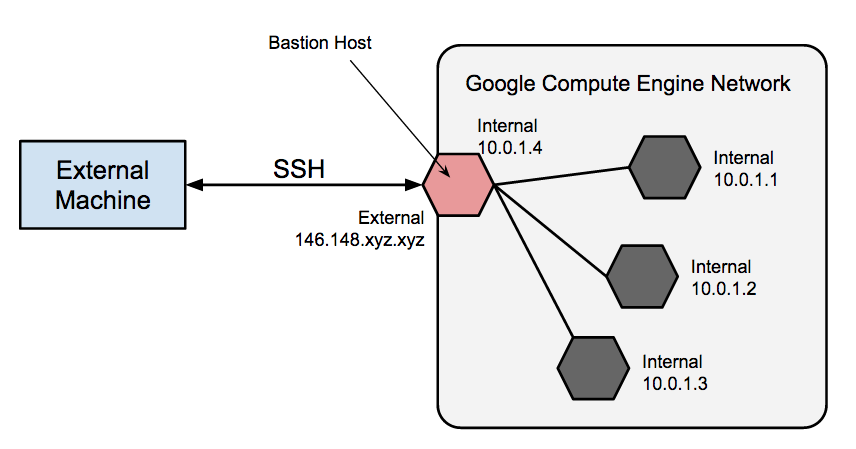
Address
When an
instance is created, an ephemeral external IP address is automatically
assigned to the instance by default. This address is attached to the
instance for the life of the instance and is released once the instance
has been terminated. GCE also provides mechanism to reserve and attach
static IPs to the VMs. An ephemeral IP address can be promoted to a
static IP address.
Firewall
A
firewall resource contains one or more rules that permit connections
into instances. Every firewall resource is associated with one and only
one network. It is not possible to associate one firewall with multiple
networks. No communication is allowed into an instance unless a firewall
resource permits the network traffic, even between instances on the
same network.
Route
Google
Compute Engine offers a routing table to manage how traffic destined for
a certain IP range should be routed. Similar to a physical router in
the local area network, all outbound traffic is compared to the routes
table and forwarded appropriately if the outbound packet matches any
rules in the routes table.
Regions and zones
A
region refers to a geographic location of Google's infrastructure
facility. Users can choose to deploy their resources in one of the
available regions based on their requirement. As of June 1, 2014, Google
Compute Engine is available in central US region, Western Europe and
Asia East region.
A zone is an isolated location within a region. Zones have
high-bandwidth, low-latency network connections to other zones in the
same region. In order to deploy fault-tolerant applications that have
high availability, Google recommends deploying applications across
multiple zones in a region. This helps protect against unexpected
failures of components, up to and including a single zone. As of August
5, 2014, there are eight zones - three each in central US region and
Asia East region and two zones in Western Europe region.
Scope of resources
All
resources within GCE belong to the global, regional, or zonal plane.
Global resources are accessible from all the regions and zones. For
example, images are a global resource so users can launch a VM in any
region based on a global image. But an address is a regional resource
that is available only to the instances launched in one of the zones
within the same region. Instances are launched in a specific zone that
requires the zone specification as a part of all requests made to that
instance.
The table below summarises the scope of GCE resources:
| Global |
Image |
| Global |
Snapshot |
| Global |
Network |
| Global |
Firewall |
| Global |
Route |
| Region |
Address |
| Zone |
Instance |
| Zone |
Machine Type |
| Zone |
Disk |
Features
Billing and pricing model
Google
charges the VMs for a minimum of 10 minutes. At the end of 10th minute,
instances are charged in 1-minute increments, rounded up to the nearest
minute.
[4] Sustained usage based pricing will credit the discounts to the customers based on the monthly utilisation.
[5][6] Users need not pay a commitment fee upfront to get discounts on the regular, on-demand pricing.
VM performance
Compute Engine VMs boot within 30 seconds
[7] which is considered to be 4-10x faster than the competition.
Disk performance
The persistent disks of Compute Engine deliver higher IOPS consistently.
[8] With the cost of provisioned IOPS included within the cost of storage, users need not pay separately for the IOPS.
[9]
Global scope for images and snapshots
Images
and disk snapshots belong to the global scope which means they are
implicitly available across all the regions and zones of Google Cloud
Platform.
[10] This avoids the need for exporting and importing images and snapshots between regions.
Transparent maintenance
During
the scheduled maintenance of Google data center, Compute Engine can
automatically migrate the VMs from one host to the other without
involving any action from the users. This delivers better uptime to
applications.
[11][12]